Builds
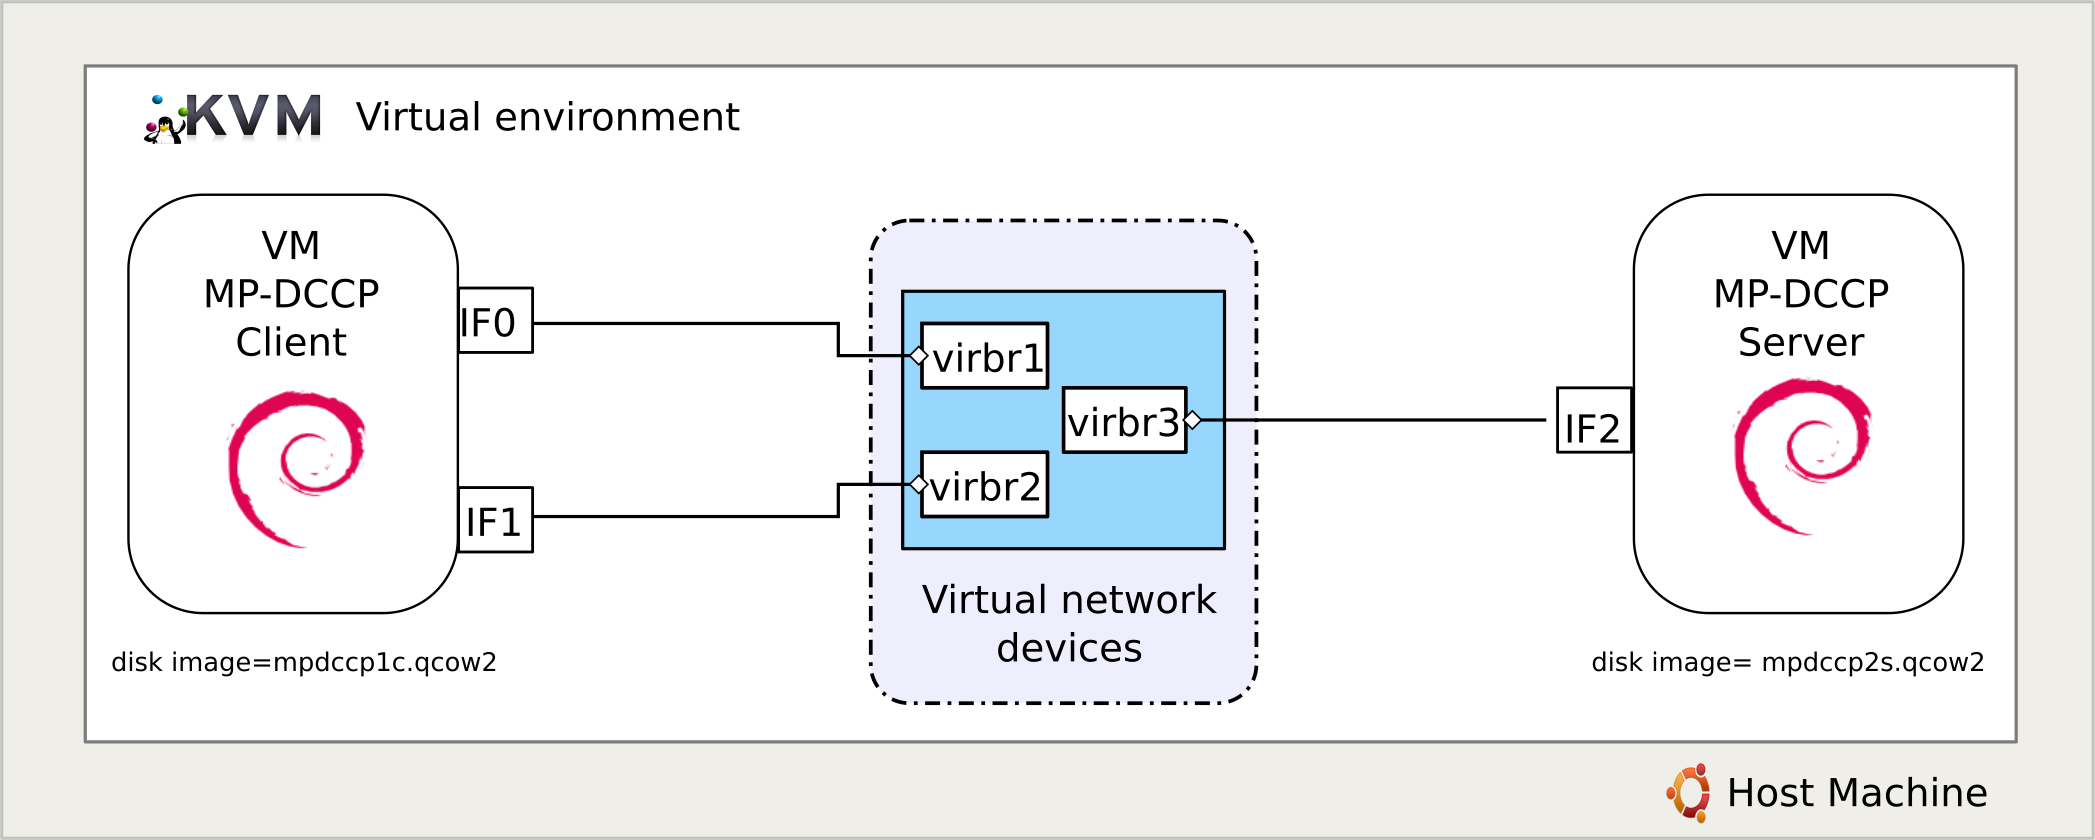
A - ready to use - version of the MP-DCCP solution is available for testing under a virtual environment. The topology depicted below can be deployed by downloading the disk images mpdccp1c.qcow2 and mpdccp2s.qcow2 and using them to set up the corresponding virtual machines with KVM. The images are client and server hosts running Debian v9.3 and the Linux kernel 4.14.111 with the MP-DCCP module v0.3 available. The subsequent instructions provide a guide to install and set up the whole topology.
Prerequisites
Install KVM and libvirt (for management purposses)
sudo apt-get install qemu-kvm libvirt-bin virtinst bridge-utilsIf desired virt manager can be installed to set up the virtual machines using a gaphical interface, however, the instructions below provide a guide to set them up using libvirt command line
sudo apt install virt-managerHost Network configuration
The virtual network devices virbr<x> and their corresponding networks have to be configured on the host machine. libvirt allows to do so, by using xml files for their definition. In this example the files net1.xml, net2.xml and net3.xml will be used
Create the xml files with the following content
net1.xml
<network>
  <name>net1</name>
  <bridge name='virbr1' stp='on' delay='0'/>
  <domain name='net1'/>
  <ip address='192.168.100.1' netmask='255.255.255.0'>
  <dhcp>
  <range start='192.168.100.10' end='192.168.100.10'/>
  <dhcp>
  </ip>
</network>
net2.xml
<network>
  <name>net2</name>
  <bridge name='virbr2' stp='on' delay='0'/>
  <domain name='net2'/>
  <ip address='192.168.101.1' netmask='255.255.255.0'>
  <dhcp>
  <range start='192.168.101.10' end='192.168.101.10'/>
  <dhcp>
  </ip>
</network>
net3.xml
<network>
  <name>net3</name>
  <bridge name='virbr3' stp='on' delay='0'/>
  <domain name='net3'/>
  <ip address='192.168.102.1' netmask='255.255.255.0'>
  <dhcp>
  <range start='192.168.102.10' end='192.168.102.10'/>
  <dhcp>
  </ip>
</network>
Define and start the networks
virsh net-define net1.xml
virsh net-autostart net1
virsh net-start net1

virsh net-define net2.xml
virsh net-autostart net2
virsh net-start net2

virsh net-define net3.xml
virsh net-autostart net3
virsh net-start net3
Enable packet forwarding and allow DCCP traffic
sysctl -w net.ipv4.ip_forward=1
iptables -I FORWARD 1 -p dccp -s 192.168.100.0/22 -d 192.168.100.0/22 -j ACCEPT
Create Client VM
mpdccp1c.qcow2 virt-install \
--name mpdccp-client \
--memory 2048 \
--vcpus 1 \
--disk /path-to-image/mpdccp1c.qcow2,bus=sata \
--import \
--network network=net1,model=virtio \
--network network=net2,model=virtioCreate Server VM
mpdccp2s.qcow2
 virt-install \
 --name mpdccp-server \
 --memory 2048 \
 --vcpus 1 \
 --disk /path-to-image/mpdccp2s.qcow2,bus=sata \
 --import \
 --network network=net3,model=virtio
Once the above commands are executed, the virtual machines will start automaticaly. Login is possible with user root or user1.
| User | Password |
|---|---|
| root | mpdccp123 |
| user1 | mpdccp456 |
VM Network configuration
The VMs are equiped with scripts to automatically detect the network interfaces, setup their corresponding network configuration, and configure the source based routing (only needed for the client VM). If different IP addressing to the one set in the xml network configuration files has to be used, the routing configuration script has to be modified accordingly
Network intreface configuration (executed at boot):
/usr/local/bin/init-net-conf.sh
Sorce based routing:
/etc/network/if-up.d/int-up-route
/etc/network/if-down.d/remove_rules
Start the VMs
The VMs are started automatically after creation. To start them again after shutdown, the following commands can be used
virsh --connect qemu:///system start mpdccp-client
virsh --connect qemu:///system start mpdccp-server
virt-viewer --connect qemu:///system mpdccp-client
virt-viewer --connect qemu:///system mpdccp-server
Tools available in the VMs
The VMs include the modified version of iperf enabled to work with MP-DCCP, as well as the tunprox encapsulation tool. Scripts to set up the tunneling interaces using tunprox are located in the user1 home directory.
Tunprox server configuration:
/home/user1/mpdccp_server_conf.sh
Tunprox client configuration
/home/user1/mpdccp_client_conf.sh